So a long time (eight months) ago, I posted something I did with LED matricies, and this thing right now that I'm writing about is kind of an extension to that. Something I always wanted to do with an LED matrix, making an Arduino game.
So here it is, Evade - an Arduino game.
Most of everything is based on the previous post I mentioned (link here again, just in case). I just added another MAX7219 for the green channel, because I'm using a bi-color matrix.
Wasn't planning on adding an LCD, but I had to show the score :(
BTW my high score is 277, so if you can build this game without a schematic then send me your high score!
This is the first time I worked with a joystick, and its surprisingly easy. It's basically two potentiometers perpendicular and interlaced so that you can control both of them at once.
That's it.
Here's the code repo: https://github.com/electricmango/evade
I don't remember the schematic, but maybe I can make one out of memory. Wait (or spam comments at me :D), and there will be an update.
한국어로 읽기: http://mangodaniel.blog.me/220437591982
Showing posts with label Arduino. Show all posts
Showing posts with label Arduino. Show all posts
July 31, 2015

May 20, 2015
New Arduino Capacitance Meter Code
I remember having a post like this that had the code for this capacitance meter I made before, but I think I deleted it.
Well, the code is back, except on GitHub.
Check out the repository here: https://github.com/electricmango/ncm
All contributions are welcome.
All contributions are welcome.
I guess there's no need to write this post because my blog only has three followers.
Here is the project video FYI:
November 26, 2014
Arduino LED matrix Hangeul(한글) Displayer
I like Blogger because it supports Unicode (like its a thing now hehe)
한글로 보기: http://blog.naver.com/mangodaniel/220192904732
I made a 한글(Hangeul, the Korean alphabet) displayer. I find the Korean script very cool. It is so simple. I like it. And thats why I used it here.
An Arduino Uno controls a MAX7219 IC. This IC multiplexes the 64 LEDs of the LED matrix. The LED matrix is a one colored red colored one(lol), but I have a bi-colored matrix, so I will extend this project for that.
The wiring was actually harder than the coding. The code is very simple, just some binary data for the alphabet and some code to send that to the IC. It uses the LedControl library. Big help from this webpage: http://playground.arduino.cc/Main/LEDMatrix
I tried adding sound to this thing, but I thought it would disturb anyone who will use this to actually learn some Korean, so I just removed it.
Thanks for reading!
The wiring was actually harder than the coding. The code is very simple, just some binary data for the alphabet and some code to send that to the IC. It uses the LedControl library. Big help from this webpage: http://playground.arduino.cc/Main/LEDMatrix
I tried adding sound to this thing, but I thought it would disturb anyone who will use this to actually learn some Korean, so I just removed it.
Thanks for reading!
한글로 보기: http://blog.naver.com/mangodaniel/220192904732
November 22, 2014
Arduino Serial to 7-segment Number Displayer
Long title. I made a thing. I announced it last week. I show it to you today.
No more weird English.
Yes more videos.
What you do is you send a two digit number through the Arduino Serial monitor. The Arduino receives the data (as I have shown in this previous video: http://electronicmango.blogspot.kr/2014/11/arduino-serial-echo.html). This post I just linked to was just a test.
Anyway, after the Arduino receives the number, it matches each digit's number to some hard-coded 7-segment number-pin data. Each one digit number has it's own corresponding set of HIGHs and LOWs for the output pins.
The Arduino output pins control two shift registers (for each digit) so that the Arduino doesn't have to work much. These shift registers will just output the predefined HIGHs and LOWs for each number mentioned above.
Now that I think of it, this is more like an experiment. But it's still cool because I did compact wiring.
I also don't like the time consuming YouTube upload system. More on that in the video's description.
한국어로 보기: http://blog.naver.com/mangodaniel/220188846851
No more weird English.
Yes more videos.
What you do is you send a two digit number through the Arduino Serial monitor. The Arduino receives the data (as I have shown in this previous video: http://electronicmango.blogspot.kr/2014/11/arduino-serial-echo.html). This post I just linked to was just a test.
Anyway, after the Arduino receives the number, it matches each digit's number to some hard-coded 7-segment number-pin data. Each one digit number has it's own corresponding set of HIGHs and LOWs for the output pins.
The Arduino output pins control two shift registers (for each digit) so that the Arduino doesn't have to work much. These shift registers will just output the predefined HIGHs and LOWs for each number mentioned above.
Now that I think of it, this is more like an experiment. But it's still cool because I did compact wiring.
I also don't like the time consuming YouTube upload system. More on that in the video's description.
한국어로 보기: http://blog.naver.com/mangodaniel/220188846851
November 20, 2014
Arduino Serial Echo
I was making something. With an Arduino. Then I found something cool. I liked it.
So I write now.
That was some weird english up there.
이 글을 한글로 보기 (See this post and pretty much every other post on this blog in KOREAN)
So I write now.
That was some weird english up there.
이 글을 한글로 보기 (See this post and pretty much every other post on this blog in KOREAN)
August 6, 2014
Slide Potentiometer Test
This is just a test. Nothing more.
How it works is rather simple; the resistance of the potentiometer is read by ANALOG IN 0, and it map()s the values so it will light 20 LEDs with 74HC595 shift registers.
I wanted to see this logarithmic pot work linearly, so I added a 'filter' thingy (from this thread in a forum; check the last post. [http://www.electronicspoint.com/threads/convert-log-pots-to-linear-pots.70898/]). Now the pot imitates a linear one. I've proven it in the video by pushing the slider to the middle, you can see in linear mode(when the LED on the right is green), the LED bar inches up to its middle too, but not in log mode(when the LED on the right turns red) (wow long sentence!).
I didn't know what to do at the end of the video, so I hesitated a little.
Check out my 한국어 글(Korean blog post) if you want to learn 한글(Korean)!
July 28, 2014
Arduino Gyroscope Game Controller
I have returned!
Not long ago, I felt the need to quit programming Java (at least for a while) and return to electronics. Here is the final product.
I made a game controller utilising the Arduino Leonardo's keyboard emulation abilities and based heavily on other peoples' work.
I used the code by Geek Mom Projects and edited it to use the Arduino Keyboard library (same link as above), so that it doesn't require a intercepting desktop application to process the gyro values and trigger key presses. (The code can work with a non-USB client Arduino (like the Arduino Uno), but you'll need that 'intercepting desktop application.')
So, the Arduino Leonardo reads the sensor data through I²C and calculates the raw values to obtain angle values (Geek Mom Projects' code; again, repeated links). Then, the Leonardo checks for specific angles to trigger keyboard presses and releases!
I really didn't do much here, only a several lines of code, but I figured it would be much more productive and fun to borrow the professional's work and tweak it a bit. Thank you Geek Mom Projects!
The game I demonstrated on is Minecraft.
Not long ago, I felt the need to quit programming Java (at least for a while) and return to electronics. Here is the final product.
I made a game controller utilising the Arduino Leonardo's keyboard emulation abilities and based heavily on other peoples' work.
I used the code by Geek Mom Projects and edited it to use the Arduino Keyboard library (same link as above), so that it doesn't require a intercepting desktop application to process the gyro values and trigger key presses. (The code can work with a non-USB client Arduino (like the Arduino Uno), but you'll need that 'intercepting desktop application.')
So, the Arduino Leonardo reads the sensor data through I²C and calculates the raw values to obtain angle values (Geek Mom Projects' code; again, repeated links). Then, the Leonardo checks for specific angles to trigger keyboard presses and releases!
I really didn't do much here, only a several lines of code, but I figured it would be much more productive and fun to borrow the professional's work and tweak it a bit. Thank you Geek Mom Projects!
The game I demonstrated on is Minecraft.
February 27, 2014
Arduino Button Mouse
I bought an Arduino Leonardo not long ago, and I wanted to make something different from my previous Arduino Uno projects. I decided to take advantage of the new ATmega32u4 [datasheet] and make a mouse.
I originally intended to do an Etch A Sketch style interface, but after burning out one of my potentiometer due to a stupid mistake, I scrapped that idea. I might use this idea on a later project!
Sorry for the long sentences, I should get on to the actual description.
There are five pushbutton switches on the breadboard. The first pushbutton switch does the clicking (the left mouse button).
Then, the next four do the moving. They each increment or decrement the x or y coordinates of the cursor by 1 on every trigger. I didn't know which axis and direction each button controlled during recording the video, so you may see some unusual behaviour of the cursor ;)
Here is the source code for this project.
If you want the schematic for this project, please contact me @[contact@leocarbonate.com].
And here is a video I made with Adobe Premiere Pro! I shouldn't have added the music; it sounds quite inappropriate for this type of video.
You can watch the video here (It's a YouTube video that is linked).
You can watch the video here (It's a YouTube video that is linked).
Arduino Thermometer
This was about half a year ago. I bought a DS18B20 Digital Thermometer from eBay. It was a good deal.
I got some information from Arduino Playground and I got to work. I added some LCD compatibility so you can measure on the go.
Here is the code on Github.
Here is the datasheet for the DS18B20.
The wiring is based on the Arduino Playground link above. If you have any problems, comment. I might make a schematic if the demand is huge.
You can watch the video here (a YouTube video).
I used Adobe After Effects and Premiere Pro for editing. Filmed with a Samsung Galaxy S.
EDIT: I actually got more help from bildr.org. The article I referred to is this: http://bildr.org/2011/07/ds18b20-arduino/
I also updated the code repo link. (It's https://github.com/electricmango/thermometer in case you missed it.)
You can watch the video here (a YouTube video).
I used Adobe After Effects and Premiere Pro for editing. Filmed with a Samsung Galaxy S.
EDIT: I actually got more help from bildr.org. The article I referred to is this: http://bildr.org/2011/07/ds18b20-arduino/
I also updated the code repo link. (It's https://github.com/electricmango/thermometer in case you missed it.)
Arduino DS1307 Real-Time Clock
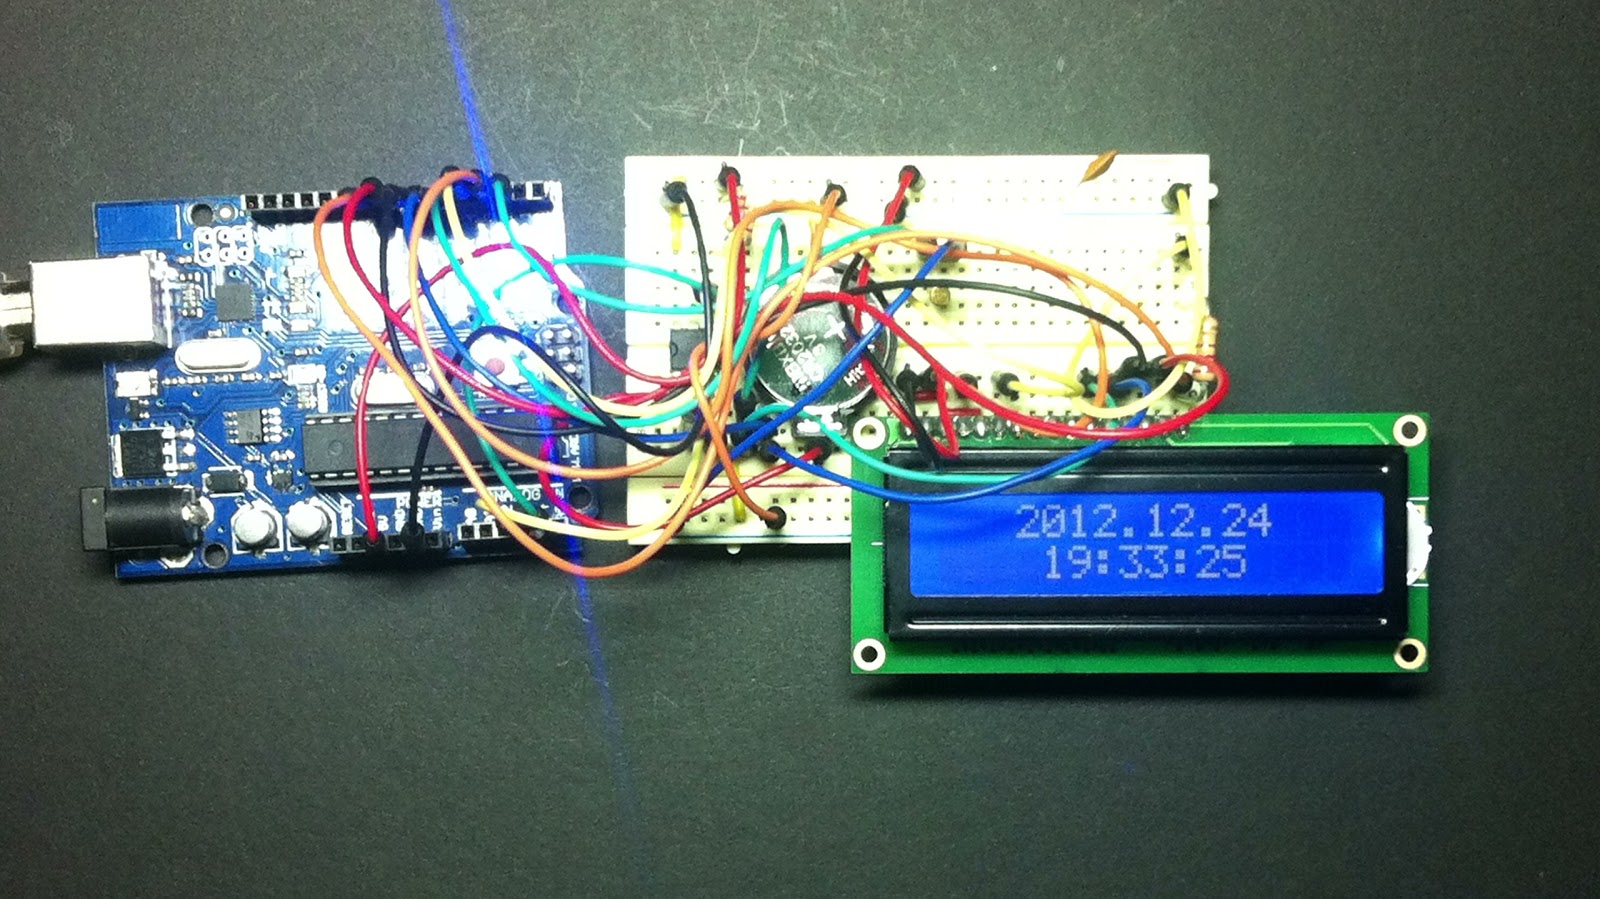
This is a reupload, following the reopening of the old Electric Mango Blogger blog! Hooray! This post has been reuploaded a total of three four times now.
Anyway, this project uses a DS1307 64×8 I²C Serial Real-Time Clock IC. It basically talks with the Arduino with a two-wire thingy.
I followed, coded, wired and powered my circuit, and it worked. I will thank ladyada for making a decent Arduino library and uploading the schematics. You can find my version(LCD-compatible) Watch the video here, in a separate window!
September 9, 2012
Arduino Sine Waves
Not long ago I ran across a code by Adrian Freed -VERY GOOD- about sine waves with an AVR. I edited the code so it would auto play, and uploaded it to my Arduino Uno, and it turned out I needed a filter. I'm lazy, so will be doing that next time when I get some inductors.
Take a look at Adrian's fascinating code!!
[EDITED code download with Auto-Start functions as shown on the video]
<Da Vid.>
Take a look at Adrian's fascinating code!!
[EDITED code download with Auto-Start functions as shown on the video]
<Da Vid.>
August 16, 2012
July 7, 2012
Arduino Voltmeter (AC + DC)
Sorry, for the delay on posts, I had semester finals.
Anyway, this is my first major project since my tests. It's a simple Arduino voltmeter.
So the Arduino reads the low voltage (0 ~ 5 volts) as a float, which is converted from a 10-bit value to a voltage by using this formula:
realVoltage = analogValue * (5.0 / 1023.0)
With the rectifier diodes, we have a voltage drop, so we add that too.
realVoltage = realVoltage + 0.58
Really, I thought it would be 1.4 volts. Turned out to be 0.6...
<video>
The blinking LED on the end of the video indicates that the voltage is getting to high for the Arduino to handle.
Code coming up (release candidate)
Anyway, this is my first major project since my tests. It's a simple Arduino voltmeter.
So the Arduino reads the low voltage (0 ~ 5 volts) as a float, which is converted from a 10-bit value to a voltage by using this formula:
realVoltage = analogValue * (5.0 / 1023.0)
With the rectifier diodes, we have a voltage drop, so we add that too.
realVoltage = realVoltage + 0.58
Really, I thought it would be 1.4 volts. Turned out to be 0.6...
<video>
The blinking LED on the end of the video indicates that the voltage is getting to high for the Arduino to handle.
Code coming up (release candidate)
May 27, 2012
Arduino with Dual Color LED Matrix
It is a test. Used the LedControl library's example code. Only one color for now, I bet I can do more than this.
May 23, 2012
Arduino Distance Sensor
Using a ultrasonic HC-SR04 distance sensor with and Arduino and an LCD. Code here.
Auto unit change (inch to foot, centimeter to meter) and more!!! I like it.
Auto unit change (inch to foot, centimeter to meter) and more!!! I like it.
Arduino 7 Segment Display Test
Not much. Just shift registers. It doesn't even display numbers. It's like testing my wiring skills.
May 10, 2012
Arduino & Shift Registers
Don't you like Bildr? Thanks to this site I made a lot of these: http://bildr.org/2011/02/74hc595/
5 shift registers with 40 LEDs and 40 470Ω resistors. First time I tried this.
5 shift registers with 40 LEDs and 40 470Ω resistors. First time I tried this.
May 8, 2012
Motor On/Off Control
With the 'Blink' sketch.
Schematic: http://blog.naver.com/mangodaniel/157300817
Schematic: http://blog.naver.com/mangodaniel/157300817
Arduino Serial Motor Speed Control
I took an old non-working code and edited it to make this. It's fun, but I don't think you'll need to turn on a computer every time you want to change the speed of a motor. For testing USB/Serial ports.
Schematic: http://blog.naver.com/mangodaniel/157300817
Schematic: http://blog.naver.com/mangodaniel/157300817
May 7, 2012
Motor PWM Control with Arduino
After the On/Off control, I wanted more fun so I used the IDE's Fade sketch. No code, for this, as I said, I used the Fade sketch.
Schematic: http://blog.naver.com/mangodaniel/157300817
Schematic: http://blog.naver.com/mangodaniel/157300817
Subscribe to:
Posts (Atom)